I wanted a frame-less, almost floating look that wasn’t glass for my photographs and a process I could do indoors without the use of harsh chemicals. Searching the web, I found some help but nothing inline with my project design. I wanted a presentation that was minimal yet elegant.
As it pertains to a time investment this presentation is considerably more then adding a picture in a frame but the results are exactly what I was attempting to achieve. The overall process takes longer but the results are well worth the effort. Additionally, the method outlined is safe, no harsh chemicals, odors or aerosols. I have a workshop in the basement and can work without any issues or smell. This is an extremely light weight solution that gives you some flexibility in the presentation. I have done both border-less and 1/8″ bordered photographs in multiple print sizes. In the end I prefer border-less, it looks seamless.
For my project I tested and use 1/8″ Art Board with a maximum size of 16″X20″. Once the resin is applied the board remains flat and rigid with zero warping.
I use MPIX for my prints after some trial and error with other providers. Their quality has been outstanding and the prints are beautiful. All the prints have been the Giclee Semi-Gloss Photographic which cost a bit more but again worth the investment. If you decide to use MPIX poke around with the applications interface before finishing the purchase. Once an item is in the cart everything can still be modified by “clicking” the image. The editing and print size selections are decent. Check all the clickable links before checkout.
Project Tools needed:
- Preferred resin – Art Resin
- Level to ensure the project is ready.
- I use the Craftsmen Torpedo Level, 9 Inch, With Shock Absorbing End Caps that I picked up on Amazon for $17.
- Plastic leveling wedges or a leveling table
- Graduated cup(s), various sizes depending on the size of the project(s).
- Stirring tool or sticks, plastic is preferred, they don’t create floaters, are reusable and easily cleaned. Plastic Tongue Depressor Spatula for Waxing work well.
- Art Board
- MDF or Hardboard is a decent substitute.
- Square wooden dowels, these set the distance from the wall and give the project additional rigidity. – Wood Pecker Crafts
- Nitrile Rubber Gloves, buy them larger than you need your hands will sweat less.
- Sponge brushes for photograph projects – 1″ and 2″.
- Used for both the Mod Podge adhesive and the Gesso. The project will use at least three per project/print.
- Nylon Reinforced Spring Clamp with Non-Marring Swivel Pads. These 2″ inch spring clamps are perfect for a third hand when mounting pictures to the stock.
- Mod Podge
- Wood glue
- Gesso – I prefer Black – Blick Art Supplies
- Available in many colors using the link provided, just search Gesso.
- Gesso adds “tooth” to canvas, board, and other commonly used painting surfaces. Apply it in thin layers to create a flexible, non-cracking, textured surface. Gesso also promotes paint adhesion to the substrate.
- Art Brayer for mounting/rolling images onto stock
- Large paper to cover the entire project when using the Art Brayer. I use butcher paper and cut as needed: Kraft Butcher Paper
- Torch, large or small, I have both depending on the size of my project.
- Spreader trowel, that has options. I use the Red Devil (Amazon) 1/8-inch notches on one side, 3/16-inch notches on another, 1/4-inch notches and the last side flat. Plastic for easy clean up and reuse.
- Dust free disposal paper towels.
- Blocks or painters tripods. Painter’s Tripods by Craft Smart are the best I found, they are plastic, resin peels of and they have a flat top. Many others come to a point which create a less stable work surface and sometimes the point will leave a blemish on soft materials like canvas. Another cheap option are Solo plastic cups, I have several sizes from shot glasses to Big Red.
- Sand Paper (Sander even better)
- Toothpicks to remove floaters from the wet pour. I like to use dental picks because they are plastic.
- These are not required but are fantastic! Crocodile Cloth Industrial Hand & Tool Cleaning Wipes 100 Count Per Package. Water Based Solution with Extreme Cleaning Power. Safe on Skin.
| Tripod | Spreader |
 |  |
One additional suggestion is to check out the available blank sizes of wood blanks before printing photographs. There are many different size blanks and it allows more creative arrangements when hanging photographs.
Prints are finished or they are on the way….
The first thing, prep the blanks. This method, It’s a three step process.
- Building blanks

- Tools needed…
- Wood Glue
- Gesso
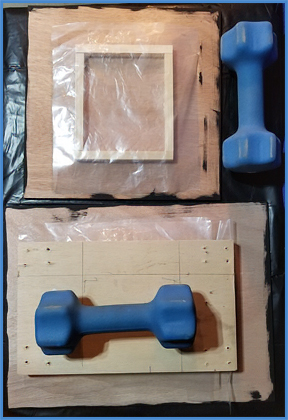
- Weight on the frame once it’s glued. I use 7 lb hand weights.
- Piece of plastic.
- Scrap board the size of the frame. This will ensure equal pressure/weight on the frame once it has a weight on it.
- Place the blank on a tripod and paint the front. Make sure to get the edges covered and clean up any paint that may have overlapped onto the the back. The goal is a nice, completely even, covered smooth surface. Walk away for at least 12 hours after painting.
- Once the front is dry create the frame, this is mounted on the back before painting to create better adhesion. The frame strengthens the mounting board, sets the distance the picture will sit off the wall and gives provides a place to add the mounting hardware and wire. This process is completed on a flat tabletop since weight will be added later in the process.
- I build my frames specific to my pictures orientation, landscape is a different than portrait. If you build multiple blanks in advance don’t be like me, make sure you grabbed the correct blank for the orientation of the photo.
- Glue the frame as designed. Once it is glued lay a piece of plastic on top of it, the scrap board and weight. The plastic barrier will keep the scrape board from sticking to the frame if there is any random glue.
- Let it dry for 24 hours.
- Paint the back and frame for moisture protection.
- Let it dry over night.
2. Mount photographs
Tools need for mounting
- Picture and frame
- Mod Podge
- Foam Brush(s)
- 3 – 2″ Spring Clamps
- Paper, larger then the project
- Art Brayer
- Lint free rag

Place the frame on a flat surface ensuring that you are using the correct blank. Working in portrait orientation is best when applying glue since it will give provide the largest profile to spread the adhesive. Align the picture on the frame as desired and using the lint free rag hold it in place. Distribute as much weight as necessary to ensure that the edges are aligned exactly as desired and the photo is flat. With a free hand place two spring clips onto the top of picture/frame to secure it in place. Check again to make sure everything is exactly how you want it. I use the third spring clip hold my picture up and out of the way giving me two free hands. Clip it to just the bottom of the photo and roll it back until it hangs out of the way.
After some trial and error I added my Mod Podge to a clear plastic squeeze bottle. It allowed me to get the right amount of glue on my frame. The coverage needs to be complete and smooth, the black Gesso should be barely visible once the adhesive is applied.
Apply Mod Podge as close to the top of the print as possible, start right at the bend and work down. Ensure there is a even wet coat all the way to the edges of the frame. Once that is done, roll the photo down onto the adhesive. I use my rag to push the photo down working center to edge. Stay away from the very edge so no glue gets on the rag. The edges will get resolved when print gets rolled. Remove the spring clips, turn the frame around so you have access to finish the unglued portion at the top.
Clear the tabletop of everything but the frame, paper and roller. Place the paper over the photo ensuring that it extends over all the edges of the frame. Keep the paper from shifting as much as possible during the rolling process. Starting in the center roll the photo to the top, start again in the center and roll to the bottom. Repeat this both horizontally and vertically. Air pockets and excess glue will be pushed to the edges.
Now that it’s mounted lift the piece holding it by the frame on the back and using a finger spread any glue that was pushed out into the edges. This will seal the photos edge and not allow resin to seep into the paper. I use Mod Podge to seal the entire edge. If you get some on the photo, no worries it dries almost clear and the resin will make it invisible. There is one exception, prints with a black background will show any Mod Podge that gets on the photo. When mounting prints with black edges I do not roll the print, the photo is pressed with a lint free rag with extra care taken when working the edge. Always make sure it is as smooth as possible, clumps will create an uneven surface in the resign when it cures.
Letting the adhesive dry completely is vital, moist glue under the print when applying resin can/will create some challenges. I give mine at least 24 hours to cure, most times 48 hours. Remember this is a marathon not a race. Embrace the process and the outcome will be outstanding.
3. Resin application
- Level
- Graduated cups
- Stirring tool
- Spreader
- Rubber gloves
- Cell phone or timer
- Project cover

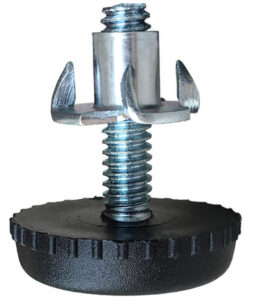
I normally jump into new hobbies with both feet. Because of this and the need for the project to be level I built a leveling table specifically for photographs. Using two 24″X20″ 1/2″ sheets of plywood and four Furniture Levelers (most hardware stores) for the table. The project took about 45 minutes and cost around $28.
Drill the appropriate size holes to mount the leveler on each corner of one sheet of plywood, about 1″ from the edge. This keeps them within working distance but far enough under the table to stay out of resin drips. Tap the anchor portion into the plywood making sure it is straight and flush with the surface.

Place the second sheet on top of the first covering the anchors and attach the two boards together with screws. Install the feet and wallah you have a leveling table. Personally I cover my main table with plastic and separately I cover my leveling table using heavy duty trash bags. I cut it around 4″ larger than the leveling table and simply lay it over the top. After many uses it still looks pretty good. Always remove dry resin from the surface to ensure it doesn’t effect the level on the next project.
If you are going to tape the back of your project to protect against drips now is the time to apply the tape. I use 3M or Frog tape. When using tape make sure that you remove it as soon as possible once the project has cured. Twenty four hours (or slightly less) is the sweet spot. Anything beyond that and the tape becomes difficult to remove from the edges.
Level the working surface and place the tripods on the level table and the project on top of the tripods. Check the piece again to ensure it’s level. Now is the time to make sure the surface of the photo is clean and dust free.
Mix the resin as directed by the manufacturer, and let it sit for a couple minutes. This will allow some of the bubbles to float to the top and burst, it also gives you time to set the timer for 30 minutes (45 minutes if appropriate), put on gloves and grab the spreader.
Holding the mixing cup close to the project, pour the resin in the center. Keeping it close minimizes adding bubbles. I normally pour center, top to bottom to make it easier to move the resin around. Do not toss the mixing cup in the trash, there will be resin on the bottom of the cup that may need if you see depressions in the project prior to covering it to cure.
I use the smallest grooves on my spreader. Spread from the center to the edge allowing some of the resin to float over the edge. Personally I don’t float the edges until I am confident I have an even spread on the majority of the project. Once resin goes over the edge recovering it is close to impossible.
While spreading don’t push the tool hard onto the photo surface, there is no need and doing so may scratch the print. Once you begin floating the edges use your spare hand to spread the resin evenly over the edge. Continue to float the edges with excess resin that is on the piece. Ensure that spare hand with resin on it it stays over any open area of the working table but not over the project. Drips on the floor will end up on the bottom of your shoes and will leave a snail trail.
The spreading process only takes about 5-10 minutes for prints up to 16″X20″.
When satisfied with the spread trash the dirty glove and grab the torch. Fire up the torch with a decent high flame, a low flame will not get the desired results. Moving the torch across the surface left to right, top to bottom and across the edges will cause the bubbles to burst and the resin will level to fill the voids.
Now is the time to get a lower viewing angle of the resin. Take a look from the side, change the viewing perspective, get low, look across the surface. This is to ensure that the bubbles are out, the surface is level and there are no floaters in the resin. If there are floaters grab a toothpick and fish them out. If you see a depression grab the mixing cup and scoop a little resin out and drop it in the depression. Don’t drop it from a height, get as close to the project as possible and only add a drop or two at one time. Review the surface again, if necessary repeat.
Once the desired results are achieved put the torch away. If tape was not usedon the back of the project, with your gloved hand run a finger under the project to remove the drops. This process also adds a nice smooth finish to the back bottom edge and should reduces/eliminate the need for sanding. Some people use painters tape on the back of the project to protect it from drips. The tape can’t be removed until the project has cured. Success with tape personally has been good if removed at 24 hours or less. When waiting longer the success level becomes more challenging as the resin continues to harden. Even when using tape running a finger on the underside of the project will still have benefits. It removes the large drips that cause challenges when removing the tape.
Cover the project and walk away for 24 hours.
When the cover gets pulled off the project two things are going to happen, you will be clicking your heels or your head will drop because of imperfections. If there are imperfections, no worries, light sanding the piece removes them. Make sure to finish with a fine grit. All surfaces should have sanding marks, if it is shiny you missed a spot. If possible never sand your project in the same area as you pour. The dust created is extreme and it tends to stick to everything.
If there were bubbles sand until the surface is smooth and even, clean the piece well by blowing out any dust in the “bubble craters” and wipe the piece clean. Simply repeat the resin coating process, scratches and craters will be filled and the project will look great. This challenge happens minimally but when it does I use a shallower spreader, the 1/8″ portion of the spreader works well for the second coat.
Image Gallery: Common Hangout Gallery

