Finding information as a beginner was tough, I had to watch a multitude of YouTube videos to bring it all together. YouTube is a great resource but this may help you get started working with resin and shorten your learning curve.
In another post I will go in-depth on how I mount photographs on 1/8″ art board as I couldn’t find anything regarding the way I envisioned creating a frame-less and a floating effect. Hopefully this will help people and eliminate some the mistakes that I realized through trial and error.
A couple quick thoughts:
- Follow the manufacturers instructions for mixing. The mixing time varies depending on the intended use and type of resin purchased. The standing time after mixing is just as important if recommended by the manufacturer.
- Mix more than you think you’ll need, not having enough to spread really creates some challenges. It also especially true if a thicker resin finish is desired. I can tell you from experience, mixing to much is better than not enough. With some resins there is a much as a 10 minute mix/stand time and around 30 minutes working time before the resin starts to set up. Having to scramble to mix more is not fun or effective.
- This is a marathon not a race. Take your time at each step of the process. Walk away for at least 24 hours when completing a resin coat/project. Rushing or over working resin will just result in challenges. Once I complete a resin pour I won’t even lift the dust cover for 24 hours.
- Ratios on 1:1 mixes, a hair under/over on resin or harder won’t ruin the project.
- Stirring briskly, or lifting the stirring device in the cup or the spreader out of the resin will create air bubbles.
- Depending on the brand and mixing ratio be aware that when mixing the solution it will get cloudy, when it is complete it should be clear.
- Once poured the project isn’t mobile, even if it’s on a rolling table. Start by getting the piece level and keeping the project level during hardening/curing isn’t and option. It’s a self-leveling liquid and moving it could create flows…you get it.
- Resin types differ, the type pf resin and methodology to use each one very much depends on the brand, ratio, type of project and thickness of the pour. They are brand/type specific and one size does not fit all.
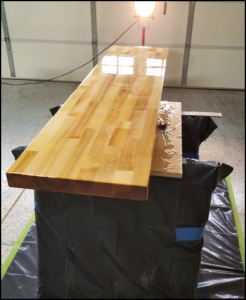
- If you are doing pours in open space watch where you walk. I tape down plastic to the floor big enough to protect the floor but small enough that I could work my pour without stepping on the plastic/tarp, essentially and no walk zone. The picture below is how I set up for the tabletops. I used saw horses and created a no walk zone taped to the floor. The space needs to be large enough to capture the excess resin but small enough so that working on the piece with minimal reaching is the objective.
- Heavy duty plastic bags and tarps are your friend! Resin peels right off when it dries.
- This one is important so I repeat, having the project level is a must, not an option. Liquid will move to the lowest point and create an uneven surface.
- You have about 30/45 minutes of working time once resin is poured, manufacturers should publish this somewhere in their directions for use. Whether it is 30 or 45 minutes, that is a long time so don’t rush, relax and enjoy the process.
- Dust and hair are your enemy! Don’t lean over the pour/project while working if it can be avoided. Have a cover big enough for the project, cover it immediately once the spread and maintenance (removing floaters, torching air bubbles) are completed and walk away.
- Don’t be afraid to use your hands to spread resin, you’re wearing gloves. Just keep in mind that once its on your hands wet resin will drip off so keep your hands over the open work space, not over the floor and not over the project.
- When floating the edges of the project make sure that the main piece has the desired coverage. Once resin goes over the edge it is unrecoverable and rushing to mix additional resin takes time.
General Tools needed:
- Level
- Graduated cup(s), various sizes depending on the size of the project(s).
- Stirring tool or sticks, plastic is preferred so they don’t create floaters, are reusable and easily cleaned. For small pours I use Plastic Tongue Depressor or Spatula for Waxing, they are stiff and easy to clean up if you do it right after you cover the project.
- Torch, large or small, I have both depending on the size of my project.
- Spreader trowel, that has options. I use the Red Devil (Amazon) 1/8-inch notches, 3/16-inch notches, 1/4-inch notches and the last side flat. Plastic for easy clean up and reuse.
- Dust free disposal paper towels.
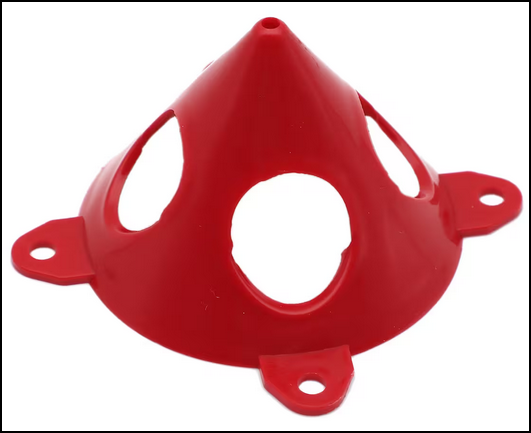
- Blocks or painters tripods. When I coat pictures I use Painter’s Tripods by Craft Smart. These are the best I found, they are plastic, resin peels off easily and they have a flat top. For table tops I use blocks or pre-built stands.
- Sand Paper (Sander even better)
- Rubber gloves
- Toothpicks to remove floaters from the wet pour. I like to use dental picks because they are plastic, wood can always leave it’s own floaters.
- Very handy and heavy duty – Crocodile Cloth Industrial Hand & Tool Cleaning Wipes 100 Count Per Package. Water Based Solution with Extreme Cleaning Power. Safe on Skin.
Tripod – Spreader

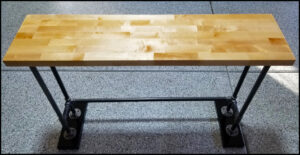
So how I got started, a friend that has limited mechanical ability or time wanted some bar tables with an industrial design for his shop. He asked me if I would build the tables and wanted the table tops resin coated for durability and appeal, the legs black pipe.
I never poured resin so it’s time play.

Coating wood and especially Butcher block is tough because there are so many pores, cracks or seams. Butcher block it’s just a series of boards glued together, plenty of space for air to hide and that will result in bubbles. Before jumping right in I tested several “junk” pieces of wood prior to my first pour. It was educational and the experience lead to much better project results. Whenever possible it’s best to test the stock first (or similar). I currently work on tables and photographs and the process is different for each project type and I use two different manufacturers resin. For table tops I tested several and ended up liking the performance of The Epoxy Resin Store’s Table Top Super Gloss Epoxy Resin. For photographs and artwork I use Art Resin. Both are low fume and I can pour in my basement. The Epoxy Resin table top has a very mild odor and Art Resin has virtually no order.
Table tops are pretty straight forward and it’s an extremely repeatable process if you are simply pouring over store bought stock. The main focus is to prep the stock from beginning to end, have a smooth and clean surface. This will result in the project being more successful.
When pouring on unsealed wood begin with a skim coat thick enough for coverage and adsorption but not as much of a normal pour. There are several calculators available, Art Resins is pretty accurate. Ensure that you have enough epoxy to coat the project including the edges. When pouring keep the container with the finished mix as close to the surface of the project when pouring, this will reduce bubbles and splattering. Pour in the center and the entire the length of the project. This will simplify spreading the resin. After the pour do not throw the mixing cup in the trash, there is resin in that cup that may be needed at the end of the process.
I use the smallest notched side on my spreader for my skim coat. The reason behind the thin coat is to limit excessive sanding. The skim coat will fill any pores/voids and result in bubbles. On this coat time is the enemy, all the pores and voids will most likely continue to create bubbles once the project is covered and begins curing. I have covered table top projects that look like glass and come have back to bubbles in my finish once it cured. Know that bubbles will most likely be present when the skim coat has cured.
Make sure that there is a consistent/even coverage on the main portion of the project before floating the edges. I work extra resin close to the edge but ensure that the main stock is evenly covered, then take the resin that I moved close to the edge and float the epoxy over the edge slowly. Use your extra hand to spread the resin over the edge to ensure even coverage, it works well. Once that hand is used, it drips. Keep it over your project table to stop any from dripping on the floor and walking through it.
Resin will absorb fairly quick on the edges, especially the end cuts. Float the edges slowly using small portions, this will allow you to repeat the process several times. Work around the project in a circular motion, by the time you get back to the starting point some of the epoxy will have been adsorbed and may look dry. Repeat the process.
Resin is difficult to recover once it’s worked over the the edges. When it’s over, consider it gone.
The spreading process is completed, move around, change the viewing perspective, get down to about the same level of the project and look for floaters. The view should be a smooth shiny coat with no imperfections. Remove any floaters with a tooth pick and fill any noticeable depressions in with the resin remaining on the bottom of the mixing cup. Using the stir stick, scoop up a little resin and drop it into the depression. Don’t drop from a height, get close and start small, be confident since this is a self leveling liquid and the drips will flatten.
Done, it looks great except for bubbles, clean the spreader and grab the torch. You’ll have to get a feel for this process but the goal, torch the entire project, top to bottom, left to right and the edges. Start with the torch on high a decent distance away (approx 4-6 inches) and move it closer if the bubbles don’t burst. It is important to torch the entire project, bubbles equal sanding. Move at a decent pace, movement should never stop. If there is stream/smoke rising during this process, back off you’re to close….. find the sweet spot.
Just before covering the project check again for floaters and run a scraper or finger (gloved hand) on the bottom of the project. This will remove the drips, seal the bottom edge by spreading the drips. The biggest bonus, it will reduce any possible sanding. I use the finger method to feel the resin smooth out and walk around until until the flow stops.
Floaters gone, resin level, drips gone….. cover it and walk away for at least 24 hours.

Once this skim coat is cured sand as necessary to remove imperfections. If it can be avoided don’t sand in the same area where you pour. Having clean lint-less rags is a must and if a compressor is available to blow the project clean, even better. I have a compressor, when weather permits I sand outside and then blow the project as clean as possible. Once that is complete I go over it with Crocodile Cloth wipe, they are moist and do a real nice job cleaning up. Don’t be concerned is there are sanding scratches or small pockets in the resin that the bubbles created as long as the surface is level and everything is clean. The next coat will fill them and dry clear, just make sure it is smooth/level, very clean and dust free. When sanding using 200 grit sand paper for the final pass works well.

After the skim coat and sanding are complete simply repeat the steps applying a thicker finish coat. If everything worked as planned and the voids/pores were filled and the next coat should look beautiful. If it doesn’t, sand and repeat.
Link to coating photographs in more detail: Frame-less Floating Photographs using Resin


